
To integrate Zoom into our VirtualCrowd platform, you will need access to the following;
- VirtualCrowd Dashboard/CMS
- The front-end of the platform
- A Pro, Business or Enterprise Zoom account (https://zoom.us/)
N.B. The Zoom API and Client SDKs are not available to Basic Accounts. If you have a basic account and want to set up an integration with our platform, you will need to speak to zoom directly to discuss upgrading your account. If you are not the account owner or an admin on the account, you may also need to check that you have been given developer privileges. This can be set by account owners and admin here.
Step 1. Zoom Developer Platform
Once you are logged into zoom, you will need to navigate to the developer platform. You can find this under solutions in the top left hand menu

Then you need to click on 'build app' in the top right next to your initials as per the shot below:

You are now ready to start building your app ready for integration with the platform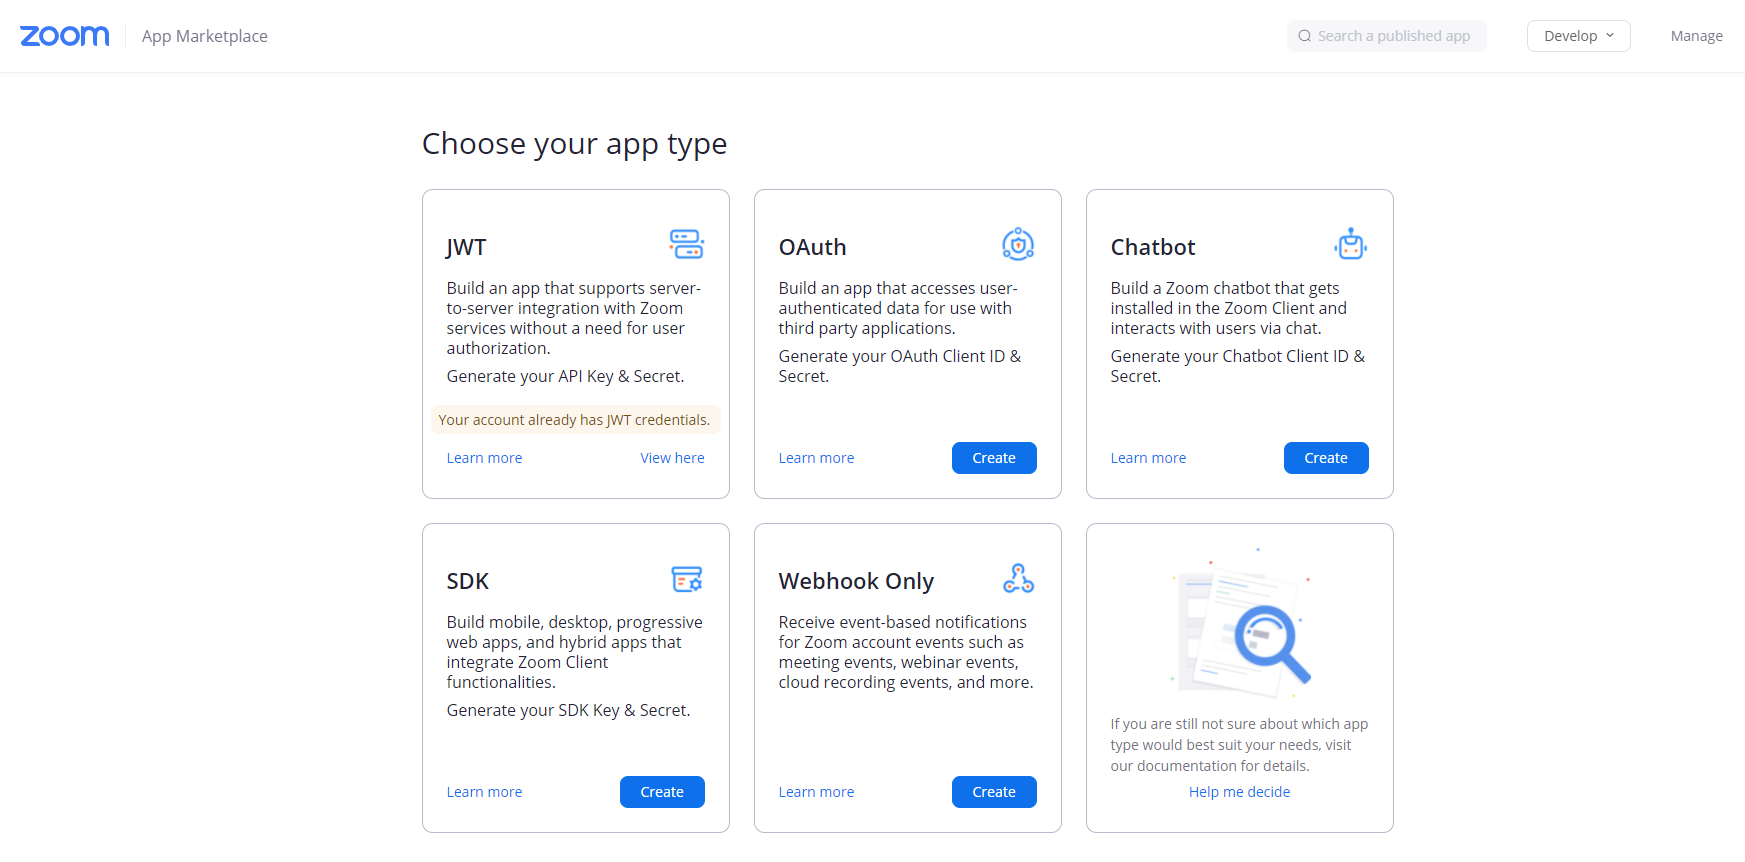
From here, please follow these steps:
1. Click on "Create" under JWT and fill in the fields as appropriate (More info can be found under 'Useful Links' at the end of this guide)
Please note: If you are not the account admin, then you won't automatically be given developer privileges and so will need to contact them to be able to create a JWT.

You will only need to do this once as you can only have one JWT per zoom account. You will need to make note of your API Key and API Secret ready to paste into the CMS later.
2. Click on "Create" under OAuth and fill in the fields as appropriate (More info can be found under 'Useful Links' at the end of this guide)
Please note: You can have multiple OAuth's under the same zoom account, so you will want to have a new one per CC platform. Make sure your app type is 'account-level app' and that you turn off the option to publish the app. You will need to make a note of your Client ID and Client Secret ready to paste into the CMS later.

3. Add the following redirect URL:
https://api-cms.crowdcomms.com/cms/integrations/zoom/redirect-callback/
4. Add the following whitelist URL: https://api-cms.crowdcomms.com/
5. You can click "continue" through the information and features sections as the app is not being published anywhere
6. When you get to "Scopes", click the plus to "add scope". Select the option to "view and manage all..." for both meetings and webinars respectively, depending on what you are using.

7. Click "Done" and then "Continue". This is then the developer setup complete. You can then navigate back to https://zoom.us/
8. Schedule the meetings/webinars you would like to integrate via zoom as normal
Please note: As the integration is set up by one central person's zoom account, we recommend using the 'alternative hosts' option, so that whoever is running each specific meeting is able to start it. You will need to then communicate the meeting link with them as you would outside of the platform.
Step 2. CMS
1. Log into the VirtualCrowd dashboard with your credentials
2. Select the event
3. Click on Plugins (You can also get here directly via this URL:
https://dashboard.crowdcomms.com/app/appshortcode/integrations (replacing "appshortcode" in the link above with the shortcode of your event)
4. Click on Zoom

5. Paste the JWT Client ID (API Key) and Client Secret (API Secret) you took note of earlier
Please note: If you forgot to make note of this earlier, you can go back to the developer platform and find your JWT here: https://marketplace.zoom.us/develop/create
And you can find your OAuth by navigating to the marketplace, then manage to find your app. Link here: https://marketplace.zoom.us/user/build
6. Click on "Authorize"
Please note: Your browser will need to allow popups in order for the authorisation to work. This is to generate the success message. Without this, the CMS will generate an error and you won't be able to import your meetings.
7. You will receive a successful authorisation message (If authentication has failed, see troubleshooting section)
8. Click on "Libraries"
9. Click on "Zoom meetings and Webinars"

10. Click on the "Import Meetings & Webinars"

11. Select the meeting(s) and or Webinar(s) you wish to import (Switch between Meetings and Webinars using the TAB)
12. Click "Import Now" (At this point you can select a meeting/Webinar and edit them. You can add an image and or change the description also - this change will only be visible in CC)
 13. Click on "Builder"
14. Click on "Agenda"
15. Select your agenda session and click on the "Edit" icon
16. Click on the "Embed"tab

17. Use the drop-down menu under "zoom meetings & webinars" to select your meeting/Webinar
18. Click "Save". Your integration is now set up and ready to test via the front end.
Step 3. FE
1. Log into FE (Front-end) using your credentials
2. Go to the Agenda module
3. Click on the meeting/Webinar (NOTE; if you are hosting the meeting/Webinar, you will need to return to Zoom to start the session)
Please note: We advise that hosts join ONLY via zoom as normal to avoid any feedback loops/repeated audio. Zoom session details should be pre-filled for participants, allowing them to join the session.
4. Click on "Join meeting"

Please note: The host will have to start the meeting before anyone else is let in the meeting, and zoom controls on microphones and cameras etc will be there also, same as normal. Once the session is over you can simply 'leave meeting' in the usual fashion.
Best Practices
- Utilise the 'alternative hosts' feature
In zoom you can't start concurrent meeting from the same account unless you are a licensed user on an Enterprise, Business or Education account. With these accounts, you can run 2 meetings concurrently. The only thing to rememer with this is that you still can't be in two meetings at once, so one of them will need to have an alternative host added. You could either do this at point of setup, or you could start one meeting, make someone the host, leave and then start the other meeting. Please not that you can't use alternative hosts on both meetings. To run concurrent meetings you will need to be the host of one of them. Basic and pro accounts do not have this function and can only have one meeting at a time, regardless of the use of alternative hosts. You can find more info here on alternative hosts and running concurrent meetings. - Utilise Scheduling privileges
As only one Zoom account can be linked to a VirtualCrowd platform, this feature could be a good way to set up your meetings. This allows you to give privileges to another user or users to set up meetings on your behalf. You could give scheduling privileges to all users who need to run the meetings so they can set them up and also therefore act as an alternative host. this will require a bit more setup and the use of a plugin so please allow yourself time to set this up and test in enough time ahead of your event. To use this feature, both yourself and those you are giving privileges to need to be licensed users, or they can be sub accounts on your master account. For more information on this, please see here - Utilise zoom's own breakout feature
If this setup suits your needs, this will be the easiest to set up as you only need to set up one meeting in zoom which everyone can join through the platform. You will still need to set some things up in zoom first, but it will avoid the concurrent meetings issue. then people can breakout using zoom's own feature. You will need to be the account owner or have admin privileges to set this up and will need to enable breakout rooms via your account. You can assign people automatically, manually, or let participants choose. If you want to pre-assign people, then all users will need to have a zoom account. Be extra careful with this option as they would therefore need to be using the same email for the VirtualCrowd platform for it to work. Some useful links on this feature can be found here for enabling breakout rooms, managing breakout rooms & pre-assigning participants to breakout rooms.
Notes
- Meetings will show upcoming only (not previous meetings)
- Webinars will show both upcoming and previous Webinars
- Authenticated Webinars are not supported
Troubleshooting
If you are have an error message when authorising the integration via the plugins page, please check the below with your setup in zoom:
CMS
- Check the redirect URL is correct
- Check that the whitelist URL is correctly filled in
- Make sure the JWT and OAuth are the correct way round
Front End
- Joining Zoom before the host has started the session will present you with a 'Joining meeting, timeout' message (Click 'Retry or Ok'
- If you are presented with a 'The session has expired or is no longer valid' message, click 'Retry'
If you still face trouble after going through this guide, please contact your support agent.
Useful Links
How to create a JWT:
https://marketplace.zoom.us/docs/guides/build/jwt-app#:~:text=To%20register%20your%20app%2C%20visit,type%20and%20click%20on%20Create.
How to create OAuth:
https://marketplace.zoom.us/docs/guides/build/oauth-app
Developer Accounts
https://marketplace.zoom.us/docs/sdk/native-sdks/developer-accounts
User Role Management:
https://support.zoom.us/hc/en-us/articles/115001078646-Role-Based-Access-Control
Zoom User Types & Roles:
https://support.zoom.us/hc/en-us/articles/201363173-Account-types